.webp)
Create a dynamic fireball effect in Adobe After Effects by utilizing fractal noise for the base, applying Colorama for fiery hues, and integrating stock footage for realism. Enhance the visual with glow, heat distortion, and meticulous blending techniques for a seamless and convincing result.
What do you think? Submit your opinion to see what others have to say!
Remember that scene from Harry Potter when a blazing fireball streaks across the sky, leaving the audience in awe of its fiery magnificence? Such visual spectacles are often the result of meticulous post-production work, and mastering them can elevate any video project. While creating a fireball effect from scratch in After Effects can be intricate, there's a streamlined solution: using a pre-designed template. The importance of this approach lies in its efficiency and the professional-grade outcome it offers, even to those relatively new to the world of visual effects. By harnessing the power of the Fireball Logo Reveal template, you can seamlessly integrate a fiery animation into your project, be it for a dramatic scene, a logo reveal, or any other creative endeavor. This article will walk you through:
.png)
Start by creating a new composition. You can do this by going to File > New > New Composition. Once you've got your composition set up, it's time to import the footage or background where you want your fireball to appear. Simply drag and drop your footage into the project panel or go to File > Import.
Now, let's create the heart of our fireball. In your layers panel, right-click and choose New > Solid. This will be the base of our fireball. With the solid layer selected, head over to the Effects & Presets panel and search for "fractal noise". Drag this effect onto your solid layer.
In the effect controls, you'll notice settings for contrast and brightness. For our fireball, I'd recommend setting the contrast to around 150 and the brightness to -25. This gives us a nice fiery texture. To make it look like it's burning and moving, keyframe the evolution. Start at 0 degrees and move forward in your timeline to the end, setting it to 1 or 2 full rotations.
.png)
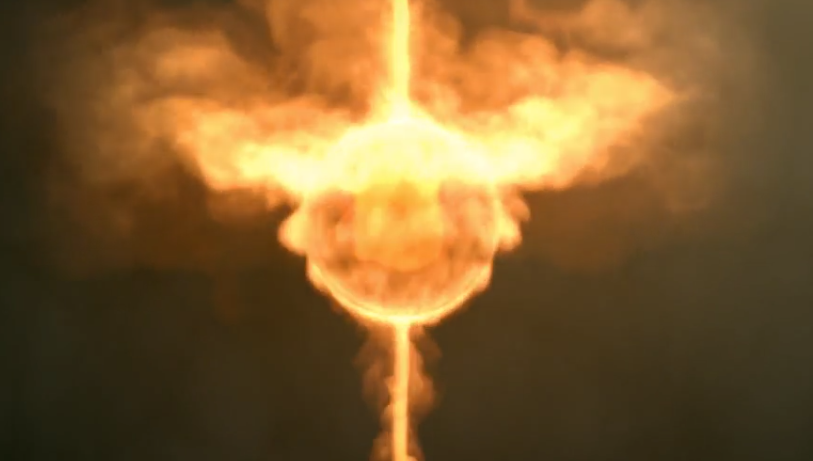
A fireball isn't just white and gray; it's vibrant with reds, oranges, and yellows. To color our fireball, we'll use the Colorama effect. Apply this to your solid layer. Within the Colorama settings, you'll find an option called 'Output Cycle'. Here, you can pick a range of colors. Choose colors that transition from deep reds to bright yellows. This will give your fireball that fiery look we're aiming for.
To give our fireball shape and movement, we'll use masks. With your solid layer selected, grab the ellipse tool from the top menu. Draw a circular mask on your solid layer. This shapes our fireball. Now, to make it move, keyframe the mask path. Start from the point of origin and move it across the screen.
To give the fireball a more organic feel, apply the Turbulent Displace effect. This effect can be found in the Effects & Presets panel. It makes the fireball move in a fluid, natural manner, rather than a straight line.
Every fireball emits a warm glow. Duplicate your fireball layer by selecting it and pressing Ctrl+D (or Cmd+D on Mac). On this duplicated layer, search for the Fast Blur effect in the Effects & Presets panel and apply it. Increase the blurriness to around 30. This creates a soft glow around your fireball, enhancing its realism.
Heat rises and distorts the air around it. To mimic this, create a new adjustment layer by right-clicking in the layers panel and choosing New > Adjustment Layer. Apply the Displacement Map effect to this layer. Set the displacement map layer to your fireball layer. Adjust the vertical and horizontal displacements to around 10 each. This simulates the heat distortion around the fireball.
For added realism, consider importing stock footage of real fire or sparks. Place this footage above your fireball layer. In the layer blending modes (found in the layers panel), set the mode to 'Screen'. This allows the real fire to blend seamlessly with your animated fireball, giving it depth and authenticity.
After Effects templates can be a lifesaver, especially when you're looking to achieve a specific effect without starting from scratch. The Fireball Logo Reveal template from Envato Elements is one such tool that can help you create a stunning fireball effect with minimal effort. Let's dive into how to use this template to its fullest potential.
Browse Templates, Extensions, Plugins & Presets....
Search
Browse Graphics, Mockups, Brushes & More!
Search
Room 37, 18 Footbridge Bvd, Wentworth Point, NSW Australia
jack@freevisuals.net - Emails checked hourly
0414 708 083
.png)
.png)
.png)
.png)


.webp)

.png)
.png)
.png)
.png)
.png)
.png)
.png)
.png)
%20(1).png)

.png)
