How to Zoom in Lightroom - 3 EASY Ways

To zoom in Lightroom, familiarize yourself with keyboard shortcuts for quick adjustments, utilize the Navigator Panel for precise zoom levels, and employ the Zoom Tool for specific ratios. Navigate through your zoomed-in image using the Navigator Panel or direct image navigation for detailed and efficient photo editing.

December 3, 2023
How to Zoom in Lightroom - 3 EASY Ways
"Video editors relying on templates lack genuine skill and creativity."

What do you think? Submit your opinion to see what others have to say!

"It's Like Video Editing On Steroids!"
- Sebastian Navarro, FreeVisuals Editor
Endorsed by Adobe, Motion Array is the ULTIMATE tool for creating high-quality videos! Browse 15M+ assets for Premiere Pro, After Effects, FCPX & DaVinci!

3 Ways To Zoom In And Out In Lightroom

Zooming in and out - one of the most fundamental, if not the most fundamental skill to learn in Adobe Lightroom before diving into the world of photo editing. It's the key to achieving meticulous detail and precision in your images, whether you're refining a portrait, enhancing a landscape, or editing a complex composite. This ability not only allows you to inspect the finest details of your photographs but also to make precise adjustments that can transform a good photo into a great one.

1. Mastering Keyboard Shortcuts for Efficient Zooming

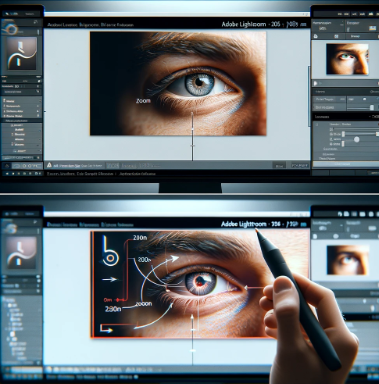
I often start by using keyboard shortcuts, as they are the fastest way to zoom in and out. Imagine you're working on a 20-megapixel image and want to inspect a small detail like the eyes in a portrait.

  • Zoom In: Press Ctrl (or Cmd on Mac) and the + key simultaneously. Each press zooms in further. If your image starts at a full view, pressing these keys once might zoom it to a quarter of its original size, letting you focus on a specific section like the face in a portrait.
  • Zoom Out: Conversely, use Ctrl/Cmd and the - key to zoom out. This action reverses the zoom in increments, gradually showing more of the image until it's fully visible again.

2. Utilizing the Navigator Panel for Custom Zoom Levels

The Navigator Panel is a powerful tool located in the upper left corner of both the Library and Develop modules. It's particularly useful when you need more control over your zoom levels.

  • Accessing the Panel: If you can't see the Navigator Panel, go to the main menu, select Window > Panels, and then choose Navigator. A checkmark will appear next to it when it's active.
  • Using Preset Zoom Levels: The panel offers preset zoom options like 'Fit', 'Fill', and '100%'. For example, selecting '100%' on a 24-megapixel image will display the image so that each pixel on your screen represents one pixel of the image. This setting is ideal for detailed edits, such as removing blemishes.

3. Employing the Zoom Tool in the Toolbar for Specific Ratios

The Zoom Tool in the Toolbar, found below your image in the Develop module, is great for selecting exact zoom ratios. Let's say you want to zoom in on a small object in the image, like a ring on a finger in a wedding photo.

  • Finding and Activating the Zoom Tool: If the toolbar is not visible, press the 'T' key. To add the Zoom Tool to your toolbar, click the triangle on the far right of the toolbar and select 'Zoom'. It will now have a checkmark next to it.
  • Using the Zoom Tool: After selecting the Zoom Tool, click on the part of the image you want to examine closely. The image will zoom in at the specified ratio, allowing for detailed examination and editing.

4. Navigating Your Image While Zoomed In

Once you've zoomed into your image, you might need to move to a different area while maintaining the zoom level.

  • Using the Navigator Panel: You'll see a smaller preview of your image in the Navigator Panel. A box around the area currently visible indicates what you're looking at. Click and drag this box to move to different parts of your image. This method is ideal for shifting your focus without changing the zoom level.
  • Direct Image Navigation: Alternatively, click and drag on the zoomed-in image itself. The cursor will change to a hand icon, allowing you to move around the image freely. This approach is straightforward and intuitive, especially when working on larger sections.

Remember, each of these methods has its place in your workflow. Depending on what you're trying to achieve with your image, you might find one method more useful than another. For instance, keyboard shortcuts are great for quick zoom adjustments, while the Navigator Panel provides more precise control.