.avif)
Freevisuals
Isolating a subject from its background used to mean either a green screen or hours of frame by frame manual masking, and neither option is available for footage you did not have the chance to plan and shoot under controlled conditions. Adobe has spent the past several years rebuilding this exact workflow around artificial intelligence, and the tool has changed meaningfully even within the past year. This guide covers the current state of subject selection in After Effects, from the everyday Roto Brush workflow through to the brand new Object Matte tool currently rolling out in beta.
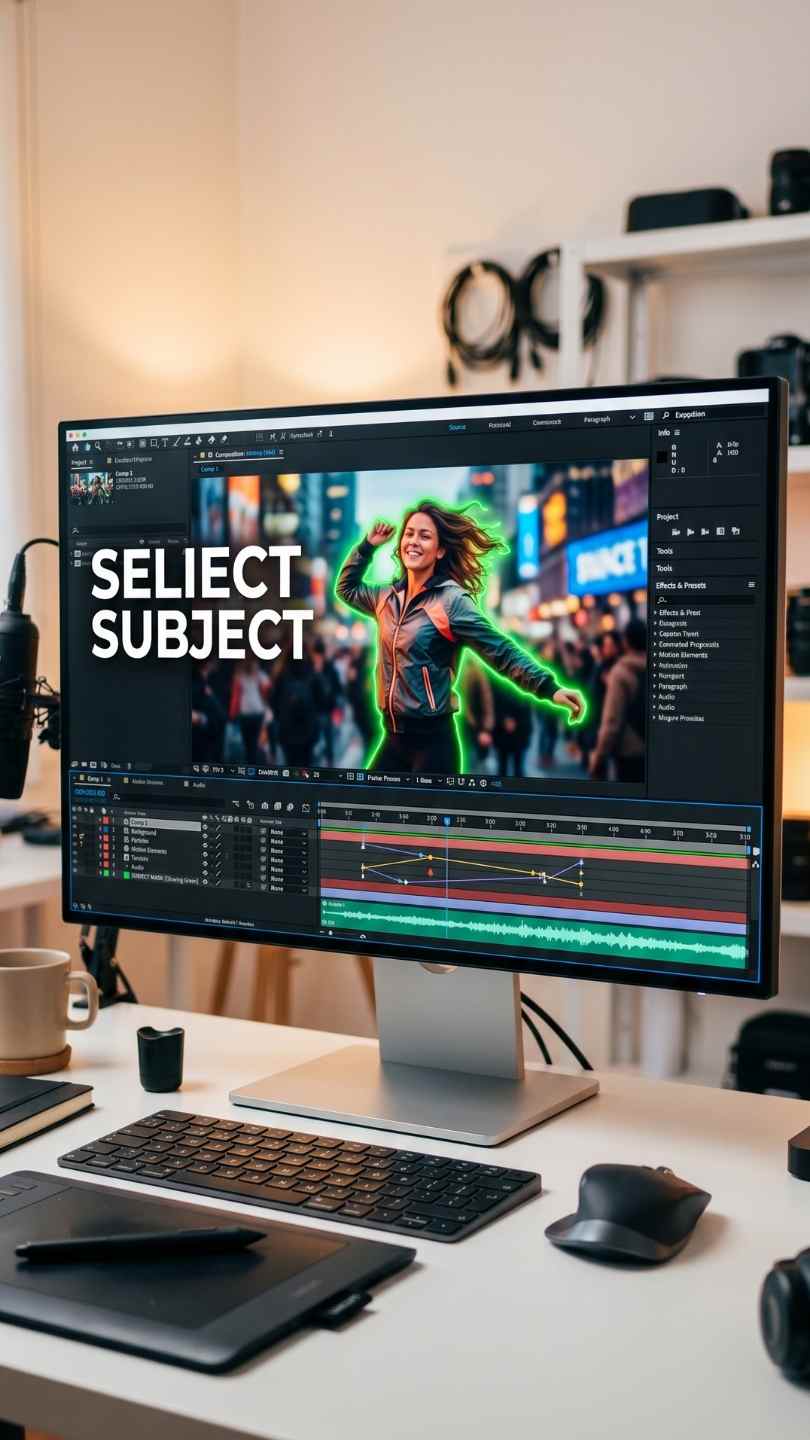
Selecting and isolating a subject in After Effects today primarily runs through Roto Brush, now in its Next-Gen third generation and set as the default rotoscoping option, powered by a new AI model offering meaningfully better precision on complex subjects like overlapping limbs, hair, and transparent material than the previous Roto Brush 2 generation. This post covers how to use Next-Gen Roto Brush step by step, how it compares to the older Roto Brush 2 and Roto Brush 1 versions still available through a version dropdown, the newly introduced Object Matte tool currently replacing the Roto Brush icon in the After Effects beta, and supporting techniques including Content-Aware Fill and Warp Stabilizer that genuinely improve rotoscoping results. It also includes a real video walkthrough, frequently asked questions, and links to Freevisuals resources worth pairing with this workflow.
By Jack Wright, Founder, Freevisuals. Updated 2026.
Separating a foreground subject from its background, technically called rotoscoping, is a core requirement across a huge range of compositing work, replacing a background entirely, applying an effect only to a subject while leaving the background untouched, or placing text and graphics behind a person so they appear to walk in front of it. Traditional rotoscoping relies on animated masks drawn by hand across every frame where a subject's outline changes, a genuinely tedious, time consuming process for anything beyond the simplest, most static footage.
After Effects has addressed this directly through Roto Brush, a tool that uses artificial intelligence to identify a subject's edges from a small number of manually painted strokes, then automatically propagates that selection across the remaining frames of a clip. This shifts rotoscoping from frame by frame manual tracing into a considerably faster process of guiding an AI model with a handful of strokes and refining its output where needed.
Roto Brush works specifically within the Layer panel rather than your main Composition panel, so the first step is double clicking your footage layer to open it there. Selecting the Roto Brush tool from the toolbar, or using the Alt plus W shortcut on Windows and Option plus W on Mac, activates the tool directly. Before painting anything, it is worth choosing a genuinely good starting frame, one where your subject is not obscured by other elements in the scene and is clearly visible in full, since this frame becomes your base frame that every other frame's selection propagates from.
Painting a stroke directly across your subject with the default green brush tells After Effects what to keep, and holding Alt or Option while painting switches to a red brush indicating what to exclude. You can resize your brush at any point by holding Ctrl on Windows or Cmd on Mac while dragging up or down, letting you switch between a broad stroke for large areas like a torso and a fine stroke for detailed areas like fingers or hair within the same selection process.
For a direct look at the newest subject selection workflow currently available, watch No More Roto, How To Use The New Object Matte Tool In After Effects, which walks through the genuinely new one click subject isolation approach Adobe has introduced. This is worth watching specifically because this feature has changed meaningfully within the past year, and seeing the current toolbar layout and workflow demonstrated live protects you from following outdated instructions that reference an older toolbar icon or workflow step that may no longer match what you actually see in your own current version.
Within the Effect Controls panel, the Roto Brush and Refine Edge effect includes a Version dropdown letting you choose between three distinct generations of the underlying technology. Version 1.0, sometimes called Classic, represents the original Roto Brush without AI assistance, relying on more manual motion threshold and damping controls. Version 2.0 introduced Adobe Sensei AI assistance, tracking a subject's edges automatically across frames and meaningfully reducing manual frame by frame correction compared to the classic version.
Version 3.0, Next-Gen Roto Brush, is now the default option in current After Effects releases, built on a new AI model offering noticeably better precision specifically for genuinely difficult subjects, overlapping limbs, detailed hair, and semi transparent material, all situations where the previous version's edge tracking was more prone to visible errors. Selecting 3.0 from this same Version dropdown activates this newest generation, and for the overwhelming majority of current rotoscoping work, this represents the best available starting point before falling back to an older version only if a specific project genuinely calls for the more manual, classic controls.
Once your initial base frame selection looks correct, pressing spacebar begins propagation, letting the AI extend your selection across the remaining frames of your clip automatically. Rather than letting this run unsupervised across an entire clip immediately, checking the first several frames manually using the frame by frame navigation keys, then only pressing spacebar to let propagation continue once you have confirmed the tracking is holding up correctly, catches tracking drift early before it compounds across many subsequent frames.
Where the selection picks up unwanted background elements or misses part of your actual subject on a specific frame, painting an additional green or red stroke directly on that frame corrects it, and the AI will factor this correction into how it handles nearby frames going forward. Once you are satisfied with the full propagated result across your clip's entire duration, clicking Freeze locks in the current matte, preventing After Effects from continuously reanalyzing it every time you scrub or preview the composition.
Adobe has recently introduced an entirely new approach available in the After Effects beta, where the Object Matte Tool icon directly replaces the traditional Roto Brush icon in the main toolbar. This tool pushes subject isolation even further toward genuine one click simplicity, letting editors select a subject with dramatically less manual stroke painting than even Next-Gen Roto Brush requires. Since this feature is currently rolling out through beta releases, its specific behavior and interface may continue to evolve before reaching general availability, and checking Adobe's own current documentation directly before relying on it for genuinely critical client work is worth doing given how actively this specific area of After Effects is currently being developed.
For editors specifically curious about where subject selection technology in After Effects is heading, this Object Matte tool represents a genuinely significant step, and experimenting with it in beta, while continuing to rely on the more established Next-Gen Roto Brush for production work, is a reasonable way to stay current without depending on a still evolving beta feature for deliverable client projects.
Camera shake is one of the most common reasons Roto Brush produces inconsistent, drifting edges, since unpredictable camera movement forces the AI to reinterpret your subject's boundaries on every single frame rather than building confidently on a stable prior reference. Running your clip through Warp Stabilizer before beginning any rotoscoping work, letting After Effects analyze and smooth out camera movement first, gives Roto Brush a considerably more stable foundation to track against. Since Warp Stabilizer crops into your frame to compensate for movement, shooting at a higher resolution than your final delivery format whenever you know footage will need this kind of stabilization and rotoscoping treatment protects against losing important subject detail once that crop is applied.
Matching your composition's frame rate to your source footage's actual frame rate is a similarly easy to overlook detail that prevents a considerable amount of downstream frustration, since a mismatch here can introduce subtle timing issues that make otherwise clean tracking appear to drift unpredictably.
Once a subject has been successfully isolated, many projects need the background reconstructed to remove that subject entirely rather than simply replacing it with something else. Content-Aware Fill, accessible through its own dedicated panel under the Window menu, analyzes surrounding footage and automatically generates a fill layer replacing your isolated subject with a plausible reconstruction of what the background would look like without them there. This dramatically speeds up object removal work that would otherwise require painstaking manual clone stamping or patching across every affected frame.
One of the most common practical applications for a clean roto matte involves placing text or graphic elements so they appear to sit behind a subject while other elements remain in front, a technique widely used in commercials and title sequences where on screen text appears to weave naturally through a scene. This is achieved by creating two duplicate layers of your rotoscoped footage, one showing the isolated subject in front, and one representing the background, with your text or graphic layer sandwiched between the two. Since gaps or errors at the edge of your subject become considerably more visible once text sits directly behind that edge, this specific application rewards a genuinely careful, well refined roto matte more than most other use cases.
A frequent mistake involves choosing a poor base frame, one where the subject is partially obscured or in an unusual pose, undermining the AI's ability to build an accurate initial understanding of the subject's actual shape and proportions before propagation even begins. Another common issue involves letting propagation run across an entire long clip unsupervised before checking any intermediate frames, only to discover tracking drifted significantly partway through, requiring a considerably more involved correction process than catching the same drift early would have needed.
Skipping Warp Stabilizer on genuinely shaky footage, then blaming Roto Brush itself for inconsistent results that actually stem from unstable camera movement, is another avoidable mistake worth watching for specifically, since the underlying rotoscoping tool is often working correctly but is being asked to track a moving target under genuinely difficult conditions it was never going to handle cleanly without that stabilization step first.
As Roto Brush works through your footage, After Effects displays a propagation banner directly within both the Layer panel and the Composition panel wherever the affected layer appears, giving you a visual indicator of processing progress even if you have navigated away to work on something else while it runs. This banner appears as a light gray chevron pattern across the affected span of your timeline, with your original base frame marked distinctly by a bright green box at the point where propagation began. As frames successfully propagate, green chevrons fill in progressively across the span, giving you an immediate visual sense of how much of your clip has been processed at any given moment without needing to manually scrub through checking each section.
Understanding this span system also matters for working with clips containing multiple distinct subjects, or a single subject that becomes fully obscured partway through a shot before reappearing later. Rather than forcing a single continuous propagation across a genuinely discontinuous situation like this, you can create a new base frame specifically at the point your subject reappears, effectively starting a fresh, separate span rather than asking the AI to somehow track continuity across a gap where your subject was not visible at all. Drawing directly on a frame outside your current span creates this new base frame automatically, and for situations where you need a new base frame within an existing span, trimming that span shorter first, so the new frame falls outside its boundary, achieves the same result.
Beyond the core Roto Brush selection itself, a dedicated Refine Edge tool sits just beneath it in the toolbar, specifically built for handling the kind of fine, wispy detail that a broader brush selection struggles with, individual strands of hair, fur, or other soft, semi transparent edges where a hard boundary line does not accurately represent the subject's true edge. Toggling between Roto Brush and Refine Edge is done through the same Alt plus W or Option plus W shortcut, pressed multiple times to cycle between the two related tools, or by long pressing on the Roto Brush icon itself to reveal Refine Edge as a secondary tool option.
Refine Edge works best when applied after your core Roto Brush selection is already largely correct, treating it as a finishing pass specifically for soft detail areas rather than a starting point for the overall selection. Adjusting settings like feather, contrast, and shift edge within the Refine Edge controls lets you fine tune exactly how these soft, detailed areas blend into whatever background or replacement footage you eventually composite your isolated subject against.
The Layer panel offers several distinct view modes specifically for evaluating how well your current Roto Brush selection is actually performing, toggled through dedicated buttons at the bottom of the panel. Viewing your selection as a simple color overlay helps quickly spot obvious errors, unwanted background elements caught inside your selection, or parts of your actual subject sitting outside it. Switching to an alpha channel view instead shows your matte as pure black and white, making it easier to spot subtler edge quality issues, soft or uneven boundaries, that a color overlay view can sometimes make harder to judge precisely.
Reviewing your selection through more than one of these view modes before committing to a final Freeze is worth the small amount of additional time it takes, since different view types genuinely reveal different categories of potential problem, and relying on only a single view mode throughout your entire refinement process risks missing an issue that would have been immediately obvious under a different viewing option.
Clean subject isolation pairs naturally with the kind of detailed compositing work covered in our Pen Tool tutorial, since manual mask refinement using the Pen tool remains a valuable complementary skill for touching up specific frames where even Next-Gen Roto Brush needs a little manual help. Our After Effects templates library is also worth browsing for title and graphic templates well suited to the kind of subject-behind-text compositing this guide covers, and our free LUT library helps unify color between a newly isolated subject and a replacement background. For premium rotoscoping-adjacent plugins and templates, Motion Array and Envato are both worth exploring, and for music to pair with a finished composite, Artlist and Epidemic Sound are both genuinely strong options.
Next-Gen Roto Brush, version 3.0, runs on a newer AI model offering meaningfully better precision than Roto Brush 2 specifically for difficult subjects like overlapping limbs, detailed hair, and semi transparent material, and it is now the default option rather than something you need to manually select.
No, Roto Brush is specifically designed to isolate subjects from ordinary, non green screen footage using AI based edge detection, though it generally requires more manual refinement than a properly lit green screen shot would.
This is commonly caused by camera shake forcing the AI to reinterpret boundaries on every frame, or by starting from a poor base frame that did not clearly capture the subject's full shape. Running Warp Stabilizer first and choosing a genuinely clear base frame both help considerably.
It is a newly introduced tool currently available in the After Effects beta, replacing the Roto Brush icon in the toolbar and offering an even faster, more automated subject isolation workflow than Next-Gen Roto Brush. Its exact behavior may continue evolving before reaching general release.
They work together rather than as alternatives, Roto Brush isolates the object first, and Content-Aware Fill then reconstructs the background to fill the gap left behind once that object has been removed from the frame.
Subject selection in After Effects has moved a considerable distance from painstaking, entirely manual frame by frame masking toward genuinely fast, AI assisted workflows, and Next-Gen Roto Brush represents a meaningful step up in reliability over its predecessor for exactly the kind of difficult subjects that used to demand the most manual correction. With the newly emerging Object Matte tool signaling where this technology continues heading, staying current with Adobe's own documentation alongside foundational skills like proper base frame selection and pre stabilization remains the most reliable way to get consistently clean, professional compositing results.
Whichever specific version or tool you end up relying on for a given project, the underlying fundamentals covered throughout this guide, choosing a genuinely clean base frame, stabilizing shaky footage first, checking your matte quality across multiple view modes, and refining fine detail separately from your core selection, remain the constant foundation that makes any of Adobe's current or future rotoscoping tools actually produce a clean, professional result.


.avif)
.avif)
.avif)
.avif)


