.avif)
Freevisuals
Download Free Final Cut Pro Teal and Orange LUT free for Final Cut Pro. Compatible with Final Cut Pro 10.4 and later. Free for personal and commercial use.
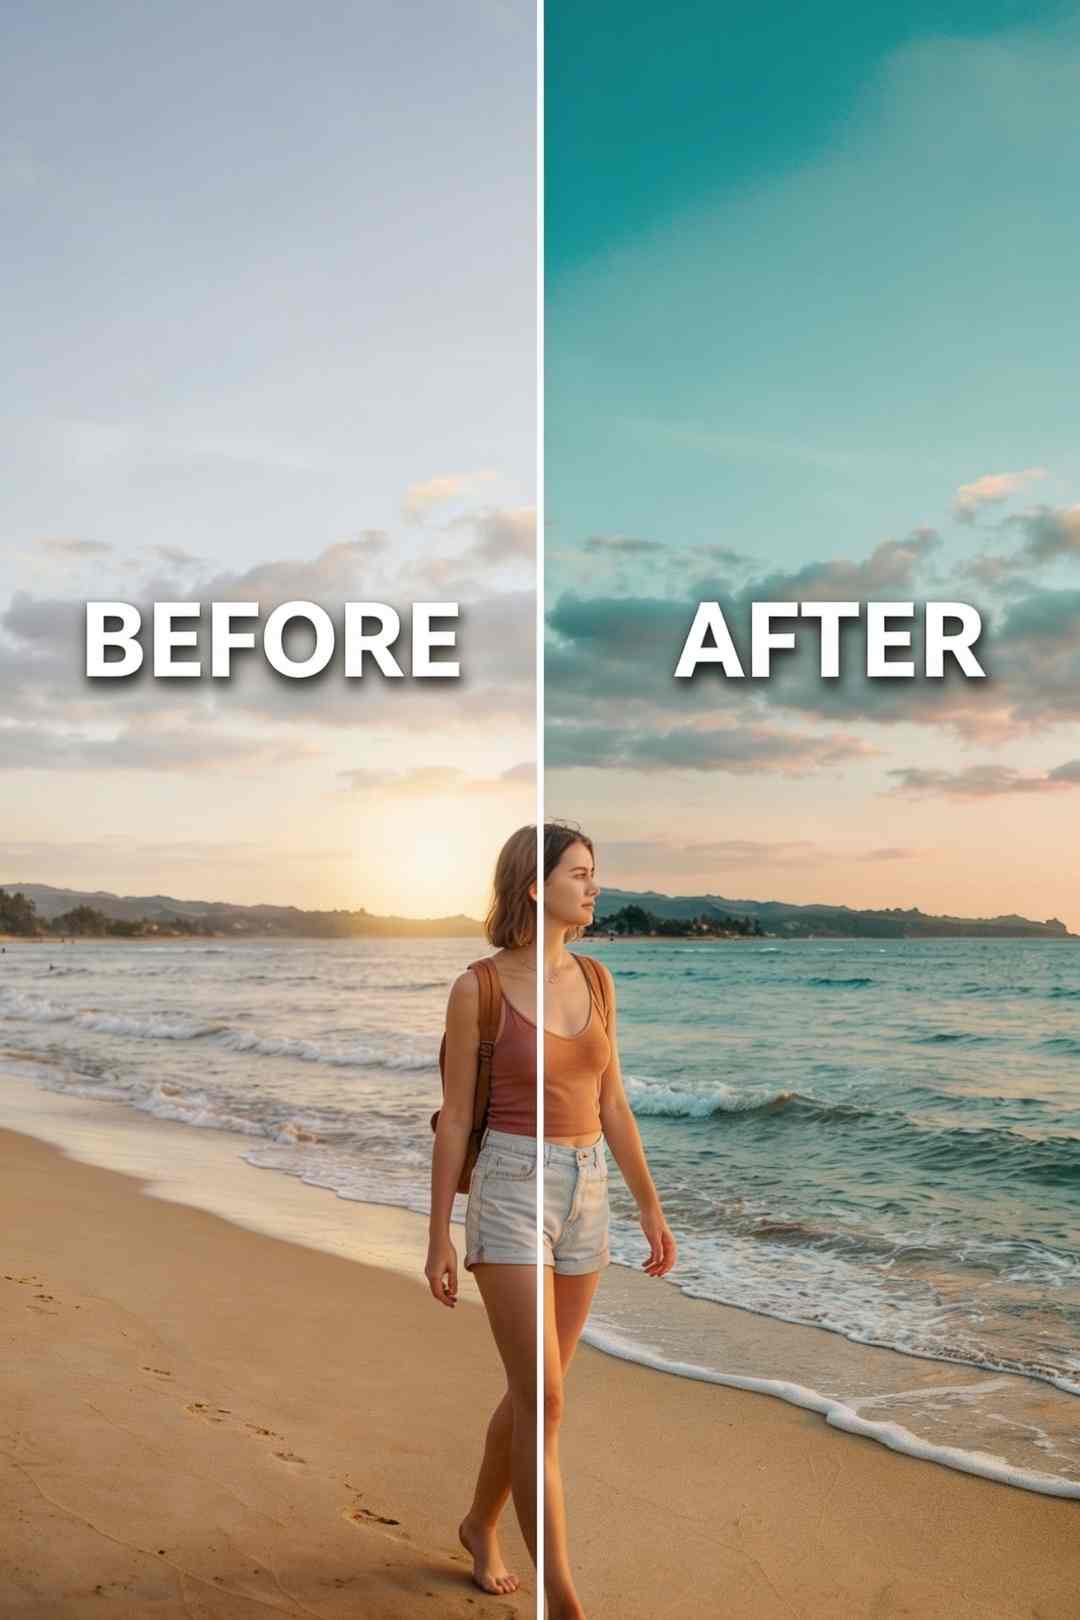
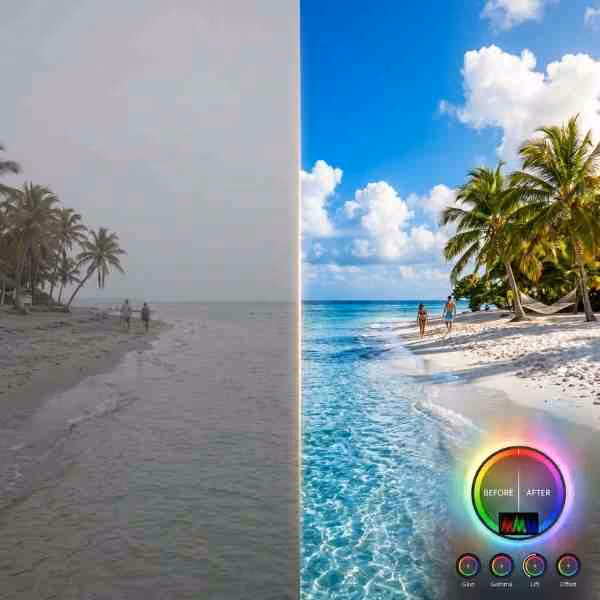
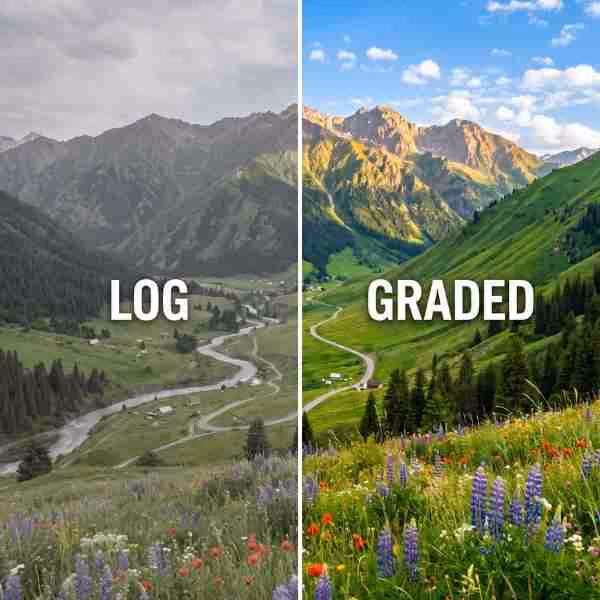
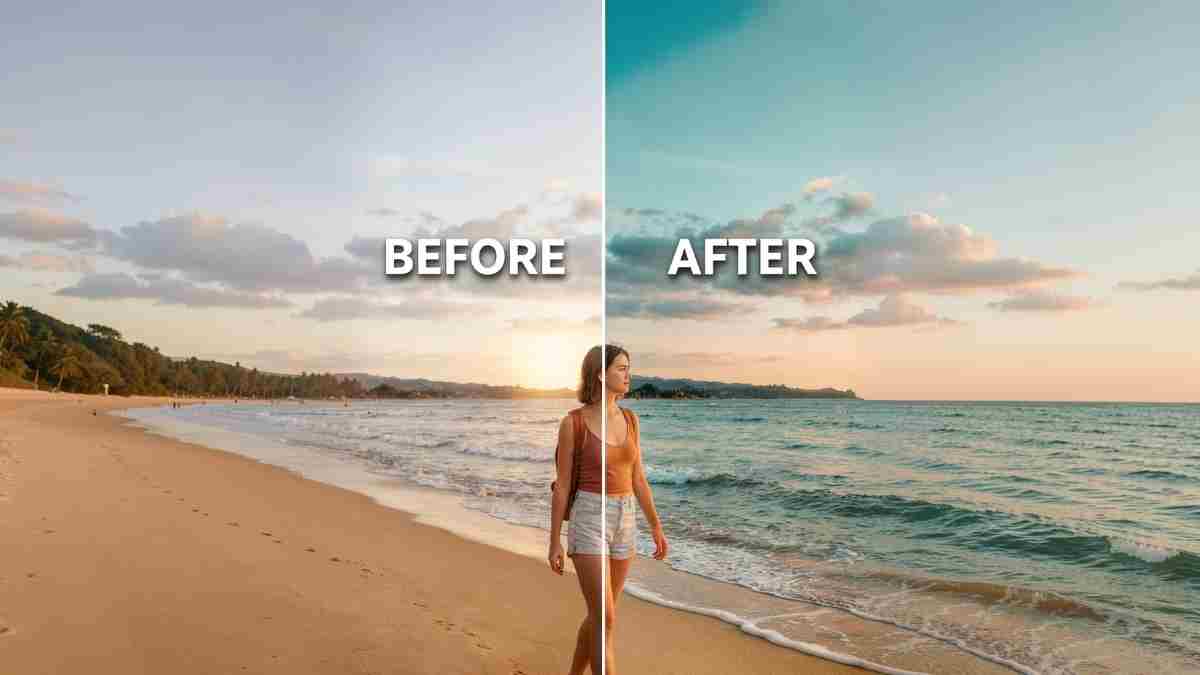
Download FREEDownload NOW!The teal and orange colour grade is the most recognisable cinematic look in contemporary film and video. It pushes warm surfaces - skin, sand, warm stone, sunlit architecture - into a rich amber-orange range while simultaneously shifting cool neutral areas like sky and water toward a deep, saturated teal. The contrast between the two creates a complementary colour tension that reads immediately as high-production-value cinematography.
This free LUT applies that look to your Final Cut Pro footage via the built-in Custom LUT effect. Download the .cube file, drag the Custom LUT effect onto your clip, select the file, and your footage has a Hollywood colour grade in under a minute. No plug-ins, no subscriptions, no prior colour grading experience required.
Download free using the button above. Compatible with Final Cut Pro 10.4.4 and later. Also works in Premiere Pro, DaVinci Resolve, After Effects and Lightroom. Free for commercial use, no attribution required.
This is a 65x65x65 3D colour lookup table, which is worth understanding because it directly affects quality. Most free LUTs use a 33-point grid, which means the colour mapping has less precision between sample points and can produce subtle banding or colour stepping in smooth gradients. A 65-point grid has eight times the data points of a 33-point grid, producing smoother, more accurate colour transitions across the full tonal range. When you look at footage graded with this LUT at full screen on a good monitor, the midtone gradients are clean.
Three things happen simultaneously when you apply this grade.
In the shadows, the black point is lifted slightly with a warm amber bias - the red channel sits marginally above the green and blue in the darkest values. This produces the characteristic matte-film quality where the deepest shadows feel warm and present rather than harsh and crushed. It is one of the defining visual differences between film-originated footage and flat digital footage, and this LUT applies that quality to whatever you shot.
In the highlights, the orange push is bold and confident. Warm surfaces - skin tones across all ethnicities, sand, sunlit stone, warm wood, beach umbrellas, warm interior lighting - shift toward a rich amber-orange that reads as sun-drenched and alive. This is not a subtle nudge. It is a deliberate creative statement, and the footage types that respond best to it are the ones where strong warmth in the frame is the point.
In the bright neutral and cool areas - sky, water, glass, neutral walls, cool interior lighting - the grade shifts toward a deep teal-cyan. The green channel climbs to approximately 0.930 and the blue to approximately 0.964 in the high-luminance values, producing a cool, saturated teal quality in anything that is not warm. The combination of orange warm subjects against teal cool backgrounds is what creates the complementary colour tension that makes the look feel cinematic rather than like a simple filter.
The teal and orange grade does not change what you shot. It reveals what the light was already trying to do.
Format: .cube (standard, universally compatible)
Type: 3D LUT, 65x65x65 high precision
Primary application: Final Cut Pro via the Custom LUT effect
Also compatible with: Adobe Premiere Pro, After Effects, DaVinci Resolve, Lightroom Classic, CapCut Desktop, Vegas Pro, HitFilm, and any application accepting .cube files
Colour space: Designed for Rec.709 footage
Minimum Final Cut Pro version: 10.4.4 (when the Custom LUT effect was introduced)
Licence: Free for personal and commercial use, no attribution required
The Custom LUT effect has been part of Final Cut Pro since version 10.4.4. If you are on a current version of FCPX purchased from the Mac App Store you have it. Here is the complete workflow.
That is the complete workflow. The entire process from download to graded preview takes under two minutes on a first use and under thirty seconds on every subsequent use once you know where the file is saved.
For grading a complete sequence, the most efficient approach is to place a Connected Clip or a gap clip above all your footage in the timeline and apply the Custom LUT effect to that single Connected Clip. The effect applies to everything beneath it in the timeline. Adjust the Mix slider once on the Connected Clip and the intensity applies uniformly across every clip in the sequence. If individual clips need different intensity, apply clip-level Custom LUT effects directly and use the Connected Clip method for the base grade.
The Custom LUT effect in Final Cut Pro can be stacked with other colour effects applied to the same clip or adjustment Connected Clip. The recommended workflow is to apply any primary correction using the Color Board or Color Wheels before the Custom LUT effect in the Inspector order, then apply the LUT grade on top. FCPX processes effects in the order they appear in the Video Inspector, so place primary correction above the Custom LUT in the Inspector to ensure the grade is applied to corrected rather than raw footage.
Watch this tutorial that is a complete walkthrough of How To Install LUTs in Final Cut Pro (.Cube Files) in 2026. This tutorial demonstrates the simple process of importing LUT packs and applying them to clips. Explore applying LUTs to individual clips or using an adjustment layer for batch application.
Because the grade amplifies warm-cool contrast already present in the source material, the footage types that respond best are those with natural warm-cool separation built into the light.
This is the strongest use case for this LUT. Golden hour footage shot outdoors in warm climates already has warm highlights and cool shadows from the quality of the natural light. The grade deepens that existing separation significantly, producing the rich amber-and-teal aesthetic that defines premium travel content on YouTube and Instagram. For Final Cut Pro travel editors, this LUT applied at 0.75 to 0.85 on a Connected Clip above the full timeline is a complete colour grading decision for a travel video in a single step. Pair it with the Artlist Film Roll Transitions for Final Cut Pro for a complete vintage-cinematic travel edit system from two downloads.
Sand, skin and warm surfaces against blue water and sky is the natural environment for this grade. The warm elements push into orange and the cool elements push into teal with almost no additional correction needed. For Final Cut Pro travel creators shooting coastal content, this LUT applied to golden hour beach footage produces results that are difficult to distinguish from high-end commercial colour grading at full intensity.
Skin tones respond well to the orange highlight push provided there is cool background content for the teal shift to work against. An outdoor portrait against blue sky or water will take this grade beautifully, with the skin picking up warmth and vitality. For close-up talking head or interview content shot in studio or indoor conditions without natural warm-cool contrast, reduce the Mix slider to 0.60 to 0.70 to prevent the orange push from looking artificial on skin.
Mixed artificial lighting environments at night - warm tungsten street lights, cool LED signage, neon - take this grade in a stylised direction that suits urban travel, documentary, and music video content. The warm light sources shift further into amber while the cool elements shift into teal, producing a high-contrast nightlife aesthetic that is a natural pairing with the LenoFX Split Screen Transitions for Final Cut Pro for urban and travel content.
Overcast or grey-sky exterior footage without natural warm-cool separation will produce a muted result because there is limited tonal contrast for the grade to amplify. Dense forest and heavily green-dominant footage can look unnatural because the teal shift interacts with the green channel in ways that push vegetation toward a desaturated, wrong quality. For green-dominant or cool-toned footage, browse the Free Mega Cinematic LUT Pack which includes the Marine, Dawn, and Cyprus grades better suited to those conditions.
Add a Video Embed element hereTitle: Get a Cinematic Teal and Orange Look By Using This Free LUT URL: https://www.youtube.com/watch?v=mnC_v8zUsPkCaption: A practical demonstration of applying a cinematic teal and orange LUT to real travel and outdoor footage, showing how the warm-cool contrast behaves across different scene types including landscape, portrait, beach and urban content.
Apply primary colour correction before the LUT. In the Video Inspector, the order of effects matters. Place your Color Board or Color Wheels correction above the Custom LUT in the Inspector so primary correction happens first. Get your exposure, white balance, and basic contrast roughly right on each clip before the LUT processes it. Because the orange push in this LUT is bold, footage with an uncorrected strong blue cast or significant underexposure will produce unpredictable results. Two minutes of per-clip primary correction before adding the LUT makes every grade look intentional.
Start at 0.75 on the Mix slider. The full 1.0 Mix is designed as a maximum, not a default. Most footage looks most natural and most cinematic at 0.70 to 0.80. The bold orange highlight push is the first quality that reads as artificial at full intensity on portrait footage. Dial it back and check skin tones before committing to the final grade. For golden hour travel footage with strong warm-cool contrast, 0.80 to 0.85 often gives the most satisfying result.
Apply to a Connected Clip for sequence-level grading. Placing the Custom LUT effect on a single Connected Clip above the full timeline is significantly more efficient than applying it clip by clip. One Mix slider controls the entire sequence. You can still override individual clips by applying a second Custom LUT effect or Color Wheels adjustment directly to any clip that needs different treatment.
Do not apply to LOG footage directly. If you shot in a LOG profile such as Canon Log, Sony SLog, Fujifilm F-Log, or any other flat picture profile, apply a technical conversion LUT first using a separate Custom LUT effect or the Color Space Override feature in FCPX Library Settings to convert to Rec.709. Then apply this creative grade on top as a second Custom LUT effect or on a Connected Clip above. Most camera manufacturers provide free technical conversion LUTs on their support websites.
Stack with other free Freevisuals LUTs for more complex results. Applying this teal orange LUT at 0.40 Mix and the Sunset grade from the Free Mega Cinematic LUT Pack at 0.40 Mix as two separate Custom LUT effects on the same clip produces a richer, more complex warm-cool grade than either achieves independently. Experiment with combining grades at lower individual Mix values for results with more nuance than a single LUT at full intensity.
This teal and orange LUT is part of a growing library of free colour grading assets on Freevisuals compatible with Final Cut Pro. The Free Mega Cinematic LUT Pack gives you 22 additional .cube colour grades covering warm, cool, vintage, dramatic and experimental styles, all usable in Final Cut Pro via the Custom LUT effect. The 10 Free Cinematic LUTs pack covers additional styles specifically well suited to DaVinci Resolve and Premiere Pro workflows but fully compatible with FCPX.
Browse the Final Cut Pro colour presets section on Freevisuals for the full collection of free colour grading resources compatible with FCPX. The Final Cut Pro templates section covers the broader FCPX template library including transitions, titles, effects and generators available for free download.
For premium Final Cut Pro templates including title sequences, lower thirds, transitions and complete project templates, Envato Elements has an extensive Final Cut Pro category under subscription from $16.50 per month. For the Artlist Film Roll Transitions for Final Cut Pro specifically, this is the transition pack that most naturally complements the teal and orange aesthetic covered in this item.
In the Effects Browser (Command-5), search for Custom LUT under the Color category. Drag it onto your clip or a Connected Clip above your footage. In the Video Inspector (Command-4), click the LUT dropdown and choose Choose Custom LUT. Navigate to the downloaded .cube file and select it. Use the Mix slider to control intensity - start at 0.75.
Yes. Free for personal and commercial use including YouTube, Instagram, TikTok, client work and broadcast. No attribution required. See the Freevisuals terms for full licence details.
Start at 0.75. The full 1.0 is designed as a maximum rather than a default. For golden hour travel footage, 0.75 to 0.85 often gives the best result. For close-up portrait content, 0.65 to 0.70 keeps skin tones natural and prevents the orange push from reading as artificial.
You do not need to install the file into a specific folder. Download the .cube file anywhere on your Mac, apply the Custom LUT effect to your clip, and use the Choose Custom LUT option in the Video Inspector to navigate to and select the file directly from wherever you saved it.
No. This is a Rec.709 creative LUT. Applying it directly to LOG footage produces dark, incorrect results. Apply a technical conversion LUT first using a separate Custom LUT effect to convert your footage to Rec.709, then apply this creative grade on top as a second Custom LUT effect on the same clip or a Connected Clip above.
Golden hour and travel footage in warm climates, beach and coastal content, portrait footage with warm subjects against cool backgrounds, and urban environments with mixed warm and cool artificial lighting. Less effective on overcast grey-sky footage and dense forest environments.
Yes. Apply the Custom LUT effect to a Connected Clip placed above all your footage in the timeline. The grade applies to everything beneath it. One Mix slider controls the intensity across the entire sequence. Override individual clips by applying a separate Custom LUT or Color Wheels effect directly to that clip.
The Custom LUT effect was introduced in Final Cut Pro 10.4.4. Any current version of Final Cut Pro purchased from the Mac App Store includes the Custom LUT effect and fully supports this .cube file workflow.