.avif)
Freevisuals
A genuinely strong LUT can turn flat, unremarkable footage into something that looks intentionally graded, in one click, before you've touched a single slider. But a LUT applied carelessly can just as easily wreck otherwise solid footage, crushing shadows, blowing out skin tones, or producing a look that reads as an obvious filter rather than a genuine creative choice. This guide covers FreeVisuals' actual free LUT library, which specific look suits which kind of footage, and the real technical habits that separate a professional looking grade from an amateur one.
FreeVisuals offers a genuinely broad free LUT library spanning cinematic, seasonal, product, and mood specific looks, all delivered as standard .cube files compatible with DaVinci Resolve, Premiere Pro, After Effects, Final Cut Pro, and CapCut. This guide covers the top individual LUTs and packs currently available, which specific scenarios each one genuinely suits, the correct technical workflow for applying a LUT without damaging your footage, and honest guidance on when a free LUT is the right tool versus when it isn't.
A LUT, or Look Up Table, is genuinely a mathematical file mapping one set of color values to another, telling your editing software exactly how a specific input color should transform into a specific output color. This is a meaningfully different thing than an Instagram style filter layered on top of an image, a LUT operates on the actual underlying color data your camera captured, rather than simply overlaying a translucent tint. Most modern LUTs use the .cube format specifically, a 3D lookup table supporting genuinely precise, three dimensional color transformation rather than the simpler, less capable 1D LUTs older software sometimes relied on.
Understanding this distinction matters practically, a well built 3D LUT genuinely respects the relationships between different colors in your original footage, where a crude filter often flattens that nuance into something that looks artificial the moment you examine skin tones or subtle gradients closely.
Rather than a single generic collection, FreeVisuals' free LUT library covers genuinely distinct creative categories, each built for a specific kind of footage and mood.
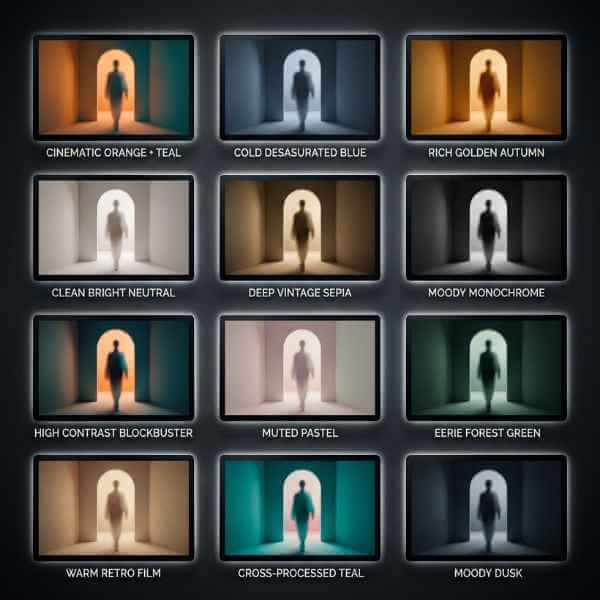
22 Free Mega Cinematic LUT Pack is genuinely the broadest single download in the library, 22 distinct cinematic grades including 80s Style, Teal and Orange, Sunrise, Sunset, Nightclub, and Supernatural looks. This is the strongest starting point specifically for editors wanting genuine variety within one download, useful across everything from narrative shorts to branded content.
10 Free Cinematic LUTs offers a more focused, Hollywood inspired set specifically, genuinely strong for creators wanting a consistent, film emulation feel across a project without the broader range the Mega Pack covers.
Arctic Blue LUT pushes footage toward a cool, cinematic blue tone specifically, genuinely well suited to winter content, tech and corporate footage, or any project wanting a deliberately cold, modern feel rather than warm and inviting.
5 Free Film Noir LUTs leans hard into high contrast, desaturated drama, genuinely suited to narrative content, dramatic reveals, or any project specifically wanting that classic, moody black and white adjacent aesthetic.
Free Skin Tone Protect LUT solves a genuinely real, common problem, many creative grades shift skin tones toward orange or yellow specifically. This LUT is built to preserve natural skin tone even while applying a broader creative look, genuinely valuable for interview, vlog, and talking head content where the presenter's actual appearance matters more than pushing a dramatic overall grade.
Autumn Foliage LUT enhances warm oranges and reds specifically, genuinely suited to fall themed content, nature footage, or any project wanting to lean into a seasonal, cozy warmth.
Minimalist Product Studio Free LUT lifts shadows and applies a soft, neutral warmth specifically, genuinely built for clean product photography and e-commerce content where an airy, premium studio look matters more than dramatic contrast.
Horror & Thriller Desaturated LUT crushes shadows and pulls saturation toward a cold, clinical tone specifically, genuinely suited to suspense sequences, flashback scenes, or any moment meant to feel unsettling.
Tropical Beach & Ocean LUT enhances turquoise water and warm sand tones specifically, genuinely built for travel and vacation content shot in coastal or tropical locations.
Free LUT Night Sky & Astro is genuinely specialized for astrophotography and night sky footage specifically, handling the particular color and contrast challenges low light, star filled footage presents.
Free LUT Coffee Shop & Cafe Vibes applies a warm, cozy indoor tone specifically, genuinely suited to lifestyle and cafe content, vlogs, and any footage wanting that particular soft, ambient warmth.
Drone & Aerial Dehaze LUT specifically addresses a genuine, common problem with aerial footage, atmospheric haze reducing contrast and color saturation at altitude, correcting for this while applying a cinematic aerial look.
Free Black & White Cinematic LUT rounds out the collection with a genuinely considered monochrome conversion, built specifically for dramatic, editorial style black and white content rather than a flat, simple desaturation.
This is genuinely the single most important technical distinction to understand before applying any LUT, and getting it wrong produces genuinely broken looking results regardless of how well built the LUT itself is. Some LUTs are built specifically for log footage, S-Log, V-Log, or C-Log from Sony, Panasonic, or Canon cameras, footage captured with intentionally flat, low contrast color to preserve maximum dynamic range for grading later. Other LUTs are built for standard Rec.709 footage, the normal, already contrasty color space most cameras output by default. Applying a log specific LUT to already standard footage, or vice versa, produces genuinely broken results, wildly oversaturated colors, dramatically blown highlights, or crushed, detail-less shadows.
The intended footage type for any specific FreeVisuals LUT is listed clearly on its individual download page, worth checking before applying anything to a real project rather than assuming universal compatibility.
Getting genuinely strong results from any LUT depends considerably on the order and method you actually apply it in, not just which specific LUT you choose. Complete your basic exposure, white balance, and any necessary log to Rec.709 conversion first, before applying a creative LUT, rather than after. Applying a creative grade on top of unbalanced base footage means the LUT is working from an inconsistent starting point, producing unpredictable results that shift depending on each individual clip's original exposure.
In DaVinci Resolve specifically, apply your LUT to its own dedicated node rather than directly onto the clip itself, add a Serial node in the Node Editor, then apply the LUT there. This keeps your color pipeline organized and genuinely lets you adjust the LUT's intensity independently through the node's Key tab and Gain parameter, rather than committing to full strength with no easy way to dial it back. In Premiere Pro specifically, applying your LUT to a dedicated Adjustment Layer placed above your clips, rather than to each individual clip separately, lets one LUT apply consistently across your entire timeline and remain easy to adjust or remove later.
For a genuinely clear, current walkthrough of the exact installation and node based application process covered above, watch How To Add LUTs To DaVinci Resolve, Import LUTs. Seeing the actual node creation and LUT browser refresh process demonstrated directly clarifies the workflow considerably faster than reading steps alone.
For a genuinely useful overview of applying free LUT packs across different creative styles, watch The Best Free LUTs Pack Of 2026, Easy Color Grading With These. This gives a genuinely broader sense of how different LUT styles change footage before you commit to a specific look for your own project.
Applying any LUT at full, default strength genuinely often looks too heavy handed, particularly on footage with mixed or inconsistent lighting throughout a scene. Dialing intensity back specifically, often into the 50 to 80 percent range rather than 100, produces a considerably more natural, integrated look that reads as a genuine creative grade rather than an obvious filter slapped on top. This single adjustment, more than which specific LUT you choose, often determines whether a grade looks professionally considered or amateurish.
It's worth knowing that .cube LUTs come in different genuine precision levels, most commonly 33-point and 65-point grids specifically. A 33-point cube is generally sufficient and genuinely more efficient for 1080p footage, while a 65-point cube offers finer color precision better suited to 4K footage where subtle gradient banding becomes considerably more visible on a larger, higher resolution frame. This distinction matters less for casual social content but genuinely matters for any project intended for larger screen delivery.
A genuinely common mistake specifically involves stacking multiple creative LUTs on top of each other, or applying an already strong LUT then adding further heavy handed secondary corrections on top. This considerably increases the risk of genuinely unrecoverable color artifacts, banding, clipping, or an overall look that reads as chaotic rather than intentional. Committing to one primary creative LUT per project specifically, then making smaller, considered finishing adjustments afterward rather than stacking several competing looks, produces a considerably more cohesive, professional result.
Since a LUT's mood should genuinely complement the rest of your production rather than existing in isolation, pairing your chosen grade with matching music and footage matters considerably. For properly licensed music matching a specific LUT's mood, a moody instrumental track for the Horror & Thriller LUT, or a warm, gentle track for the Coffee Shop LUT, Artlist offers a genuinely broad catalog covering every tone this LUT library spans. For creators specifically needing additional stock footage matching a particular LUT's intended look, aerial content for the Drone Dehaze LUT, or night sky footage for the Astro LUT, Motion Array and Envato Elements both offer considerably broader stock libraries beyond FreeVisuals' own free footage collection.
For editors who've built a genuinely strong custom grade on a specific project and want to reuse that exact look elsewhere, both DaVinci Resolve and Premiere Pro let you export your own manual color adjustments as a genuine, reusable LUT file. In DaVinci Resolve specifically, build your grade using the color wheels, then right click your node and generate a LUT directly from that grade. In Premiere Pro, adjust using Lumetri Color, then export your settings as a Lumetri preset or convert to a genuine .cube file for use across other software. This is genuinely worth doing specifically once you've developed a signature look you use repeatedly, saving considerable time compared to manually rebuilding the same grade from scratch on every new project.
Free LUTs like FreeVisuals' library genuinely excel at giving footage a fast, professional starting look without hours of manual grading, particularly valuable for social content, quick turnaround projects, and creators without extensive color grading experience. They're a considerably weaker fit specifically for footage with genuinely inconsistent lighting across multiple cameras or shooting conditions, where a single LUT applied uniformly can produce visibly inconsistent results between clips, that kind of footage genuinely benefits more from individual, manual correction per clip before any creative LUT gets applied on top.
Since FreeVisuals' library covers genuinely distinct creative categories, organizing your downloaded LUTs into clearly labeled folders specifically, by mood, by footage type, or by project category, considerably speeds up finding the right look quickly once you've built up a meaningful personal collection over several projects. Rather than one undifferentiated folder full of similarly named .cube files, grouping downloads specifically into categories like Cinematic, Seasonal, Product, and Corrective makes returning to a specific proven look considerably faster than searching through file names trying to remember which LUT produced which specific result on a previous project.
This kind of organization genuinely compounds in value the more consistently you maintain it, particularly for editors producing content on a regular schedule where reaching for a known, reliable LUT beats testing several options from scratch for every new project. Keeping a simple personal note alongside your library, which specific LUT you used for which past project and at what intensity, further speeds up recreating a consistent look across a longer running content series.
Since skin tone accuracy specifically remains one of the most common practical challenges when applying a creative LUT, understanding why this happens and how to address it beyond simply using a dedicated protection LUT matters for genuinely professional results. Most creative grades push color toward a specific overall tone, warm oranges, cool blues, desaturated grays, and human skin tones sit within a genuinely narrow, specific range that a broad creative shift can easily push outside of what reads as natural. This is exactly why a dedicated Skin Tone Protect LUT exists as its own specific category, rather than assuming any creative LUT will handle faces gracefully by default.
For projects using a different creative LUT specifically where skin tone accuracy still matters, secondary correction using a Hue vs Hue or Hue vs Saturation qualifier, targeted specifically at the skin tone range within your footage, lets you pull skin coloring back toward natural after your primary creative LUT has already been applied, a genuinely useful technique for interview or talking head content where you want a stronger creative look elsewhere in frame without sacrificing accurate skin representation on your actual subject.
For creators specifically delivering content intended for HDR display rather than standard dynamic range, understanding how LUTs interact with this workflow matters beyond the basics covered elsewhere in this guide. Most freely available creative LUTs, including FreeVisuals' own library, are built and tested specifically against standard dynamic range Rec.709 output, meaning applying them directly within a genuine HDR grading pipeline can produce results that don't translate accurately once actually viewed on an HDR capable display. For projects specifically requiring HDR delivery, treating a standard LUT as a creative reference or rough starting point rather than a final, direct application, then rebuilding the specific look manually within your HDR color space, produces considerably more reliable, accurate results than applying an SDR built LUT directly within an HDR timeline.
Since a single LUT applies its exact mathematical transformation uniformly regardless of your footage's actual content, testing your chosen LUT specifically against the full range of lighting conditions present in your real project, not just your single strongest, most flattering shot, avoids a genuine surprise once you've applied it across an entire timeline. A LUT that looks genuinely striking on a well lit, golden hour exterior shot can behave considerably differently applied to a dimmer, mixed lighting interior scene captured during the same shoot.
Building a habit of previewing your chosen LUT specifically against your project's actual darkest and brightest shots before committing to it across the full timeline catches this kind of inconsistency early, while it's still genuinely easy to adjust intensity, swap to a different LUT entirely, or apply the LUT selectively rather than uniformly across every single clip in your project.
For editors specifically working through a large volume of footage needing the same LUT applied consistently, both DaVinci Resolve and Premiere Pro support batch application methods that genuinely save considerable manual repetition. In DaVinci Resolve, applying a LUT at the Group level rather than to individual clips means every clip within that group inherits the same grade automatically, genuinely useful when you've organized your timeline by scene or by camera source and want consistent treatment applied across the entire group in one action. In Premiere Pro, the adjustment layer approach covered earlier serves this same batch purpose, one LUT applied to one layer affecting every clip beneath it simultaneously, rather than requiring you to manually apply and adjust the same LUT dozens of times across a longer project.
This kind of batch approach genuinely matters most for documentary style, interview heavy, or high volume content specifically, where manually applying and fine tuning a LUT clip by clip across dozens or hundreds of individual shots would consume considerably more time than the actual creative decision making process itself deserves.
A frequent mistake involves applying a log specific LUT to standard Rec.709 footage or the reverse, producing genuinely broken, unusable results regardless of how well built the LUT itself is. Checking each LUT's stated intended footage type before applying it avoids this entirely. Another common issue involves skipping basic exposure and white balance correction before applying a creative LUT, when correcting first and grading second produces considerably more consistent, predictable results. Leaving every LUT at 100 percent default intensity is a final common mistake, dialing back into the 50 to 80 percent range specifically produces a considerably more natural, professional looking result across most footage.
Yes, all LUTs on FreeVisuals are free for personal and commercial use, no attribution required.
All LUTs are delivered as standard .cube files compatible with DaVinci Resolve, Premiere Pro, After Effects, Final Cut Pro, and CapCut.
No, this produces genuinely broken results, always check the specific LUT's intended footage type listed on its download page before applying it.
Most LUTs are built with full strength application in mind, dialing intensity back to the 50 to 80 percent range through your software's gain or opacity controls typically produces a more natural result.
Yes, both DaVinci Resolve and Premiere Pro let you export a custom grade as a reusable .cube file for use across future projects and other software.
FreeVisuals' free LUT library genuinely spans enough range, cinematic, seasonal, product, mood specific, and technical correction LUTs, to cover the majority of real creative needs without ever opening your wallet. Getting genuinely professional looking results depends considerably more on the technical fundamentals covered throughout this guide, correcting before grading, applying LUTs to a dedicated node or adjustment layer, and dialing intensity back from full strength, than on which specific LUT you ultimately choose. Understanding your footage's actual color space before applying anything, testing across your project's real range of lighting conditions rather than just your strongest shot, and resisting the urge to stack multiple competing looks on a single project, rounds out the difference between a grade that reads as genuinely considered and one that reads as an obvious, heavy handed filter.
Affiliate Disclosure: This post may contain affiliate links. If you make a purchase through one of these links, FreeVisuals may earn a commission at no extra cost to you. We only recommend products and platforms we genuinely believe in. Read our full disclosure policy.
.avif)
.avif)
.avif)
.avif)





